Physical Address
304 North Cardinal St.
Dorchester Center, MA 02124
Physical Address
304 North Cardinal St.
Dorchester Center, MA 02124

In the previous activities, we focused on building and decorating a single page. Activity 4 was all about connecting that page to the rest of the internet and to different parts of itself. We used the Anchor tag (<a>), which is the single most important element that defines the web, to create different types of links.
This screenshot shows the results of the three main link exercises we completed:
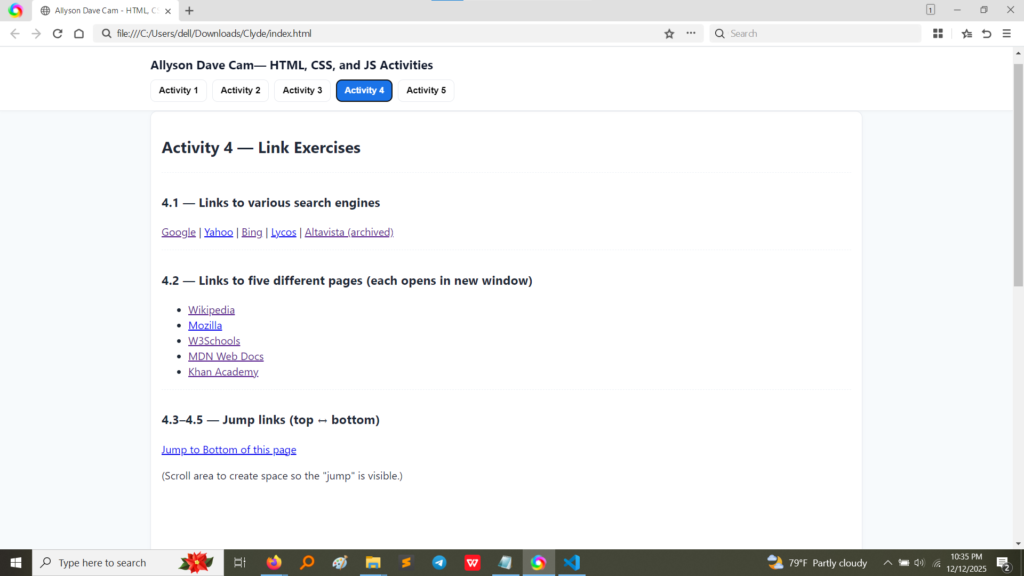
The page clearly displays:
This screenshot shows the HTML code used to create all the links in Activity 4.
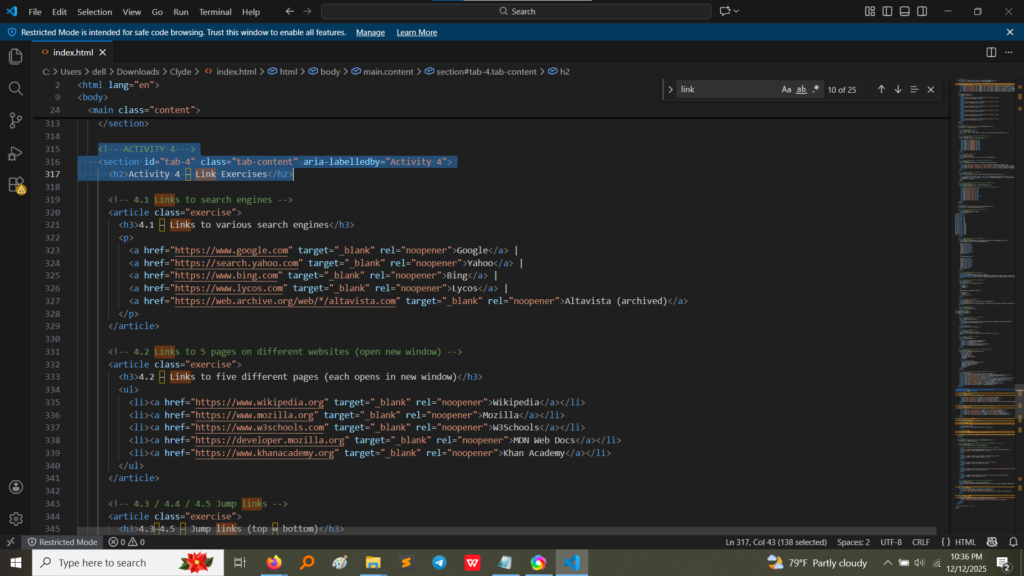
Let’s break down the three fundamental types of links we created:
<a> Tag: Every link starts and ends with this tag.href Attribute: This is the address of the link. It always starts with https:// when linking to an outside website (like https://www.google.com). This is called an absolute URL because it includes the full path.target="_blank": This is the most crucial part we added! This attribute tells the browser, “Don’t leave my current page; open this new link in a brand new tab.” This is great for keeping visitors on your site longer.rel="noopener": This is a modern security feature. It prevents the new tab from being able to mess with your original page, keeping your site safe.href attribute in a new way—to target an ID on the current page, not a new web address.id attribute to an element at the bottom of the page (e.g., <div id="bottom-target">...</div>).href attribute uses a hashtag (#) followed by that unique ID: <a href="#bottom-target">Jump to Bottom</a>.This technique creates a seamless navigation experience within a single, long page. This is called a fragment identifier or “jump link.”
Activity 4 gave me the skills necessary to build a truly navigable website. The main lessons were:
activity5.html).target="_blank" is essential for user experience. It ensures I can send visitors out to external sources without losing them from my own portfolio site.id attribute is vital for more than just styling; it creates unique bookmarks on a page that the <a> tag can directly jump to using the # symbol. This is fundamental for creating navigation menus and table-of-contents features.